'%3e%3cpath%20d='M291.402%20416.77C291.402%20346.77%20244.735%20285.603%20221.402%20263.77C111.902%20141.27%20448.902%20207.27%20636.402%20359.77C823.902%20512.27%20618.902%20613.27%20448.902%20740.27C278.902%20867.27%20291.402%20504.27%20291.402%20416.77Z'%20fill='url(%23paint0_linear_7133_54115)'/%3e%3c/g%3e%3cg%20id='Vector%209'%20filter='url(%23filter1_f_7133_54115)'%3e%3cpath%20d='M1457.57%20671.77C1457.57%20601.77%201504.24%20540.603%201527.57%20518.77C1637.07%20396.27%201300.07%20462.27%201112.57%20614.77C925.071%20767.27%201130.07%20868.27%201300.07%20995.27C1470.07%201122.27%201457.57%20759.27%201457.57%20671.77Z'%20fill='url(%23paint1_linear_7133_54115)'/%3e%3c/g%3e%3c/g%3e%3cdefs%3e%3cfilter%20id='filter0_f_7133_54115'%20x='1.32773e-06'%20y='-9.19178e-07'%20width='910.974'%20height='966.944'%20filterUnits='userSpaceOnUse'%20color-interpolation-filters='sRGB'%3e%3cfeFlood%20flood-opacity='0'%20result='BackgroundImageFix'/%3e%3cfeBlend%20mode='normal'%20in='SourceGraphic'%20in2='BackgroundImageFix'%20result='shape'/%3e%3cfeGaussianBlur%20stdDeviation='100'%20result='effect1_foregroundBlur_7133_54115'/%3e%3c/filter%3e%3cfilter%20id='filter1_f_7133_54115'%20x='837.999'%20y='255'%20width='910.974'%20height='966.944'%20filterUnits='userSpaceOnUse'%20color-interpolation-filters='sRGB'%3e%3cfeFlood%20flood-opacity='0'%20result='BackgroundImageFix'/%3e%3cfeBlend%20mode='normal'%20in='SourceGraphic'%20in2='BackgroundImageFix'%20result='shape'/%3e%3cfeGaussianBlur%20stdDeviation='100'%20result='effect1_foregroundBlur_7133_54115'/%3e%3c/filter%3e%3clinearGradient%20id='paint0_linear_7133_54115'%20x1='155.902'%20y1='200.271'%20x2='592.902'%20y2='696.271'%20gradientUnits='userSpaceOnUse'%3e%3cstop%20stop-color='%230D3126'/%3e%3cstop%20offset='1'%20stop-color='%2393F0D3'/%3e%3c/linearGradient%3e%3clinearGradient%20id='paint1_linear_7133_54115'%20x1='1001'%20y1='1139.5'%20x2='1593.07'%20y2='455.27'%20gradientUnits='userSpaceOnUse'%3e%3cstop%20stop-color='%230D3126'/%3e%3cstop%20offset='0.622615'%20stop-color='%2393F0D3'/%3e%3c/linearGradient%3e%3c/defs%3e%3c/svg%3e)


What is Vibe Design?
Vibe design is the practice of creating UI designs using natural language prompts instead of manually placing every element. Inspired by the vibe coding movement, where developers describe what they want and let AI write the code, vibe design applies the same philosophy to the visual design layer.
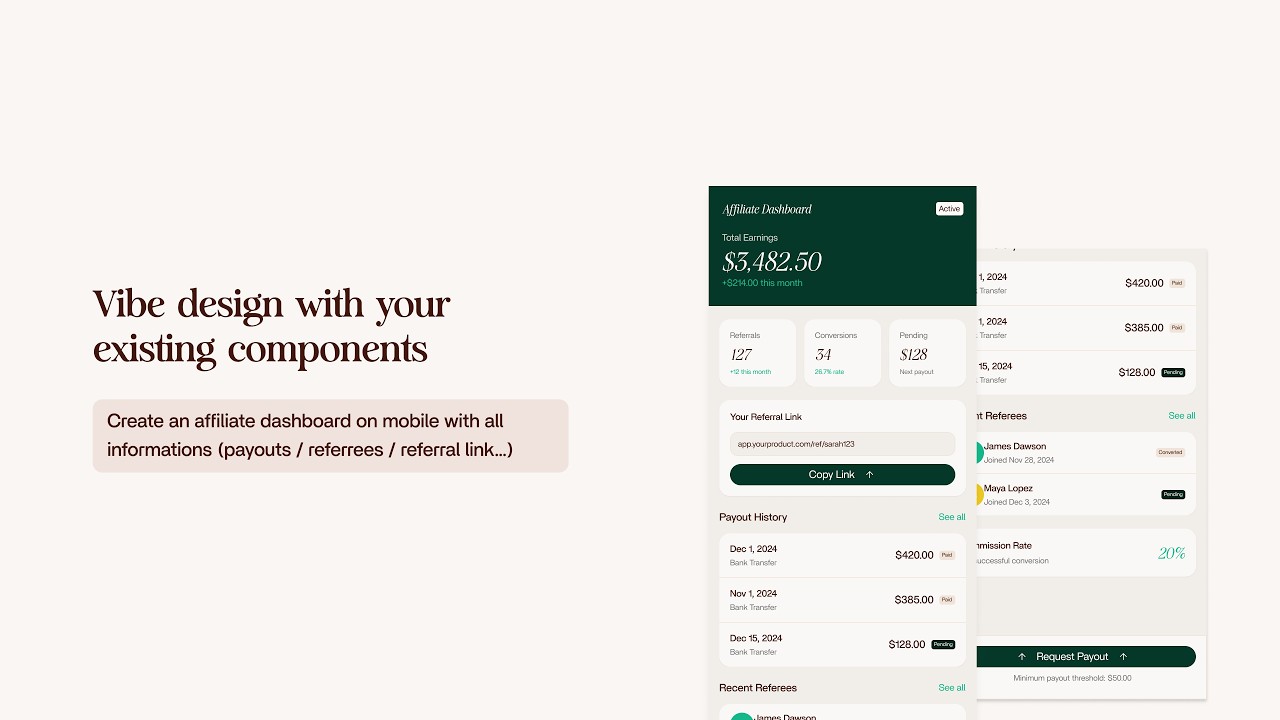
Instead of dragging rectangles and tweaking padding values pixel by pixel, you describe what you need: "Create an affiliate dashboard on mobile with payout info, referral links, and statistics." The AI handles the layout, spacing, typography, and component selection.
But the results are only as good as the context you give the AI. A generic prompt on a blank canvas produces generic, AI-looking output. The same prompt inside a project with an existing design system produces something you can actually ship.
Vibe Design From Scratch vs. With a Design System
This is where Enzo separates itself from every other AI design tool.
We ran the exact same prompt in two different scenarios: "create an affiliate dashboard on mobile with all information, payout, referral links."
From Scratch (Empty Project)
When you vibe design on a blank Figma project with no design system, the AI generates everything from raw values. The colors are hardcoded hex values. The typography uses arbitrary font sizes. The corner radii are random numbers. The spacing has no consistency.
The result works as a rough concept. It is a functional layout. But it looks and feels like AI-generated UI, because it is. There are no components, no text styles, no variables. Everything is disposable.
This is useful for quick ideation, throwaway prototypes, exploring layout ideas before committing to a design direction.
With an Existing Design System (The Real Power)
Now take the same prompt and run it inside a Figma project that already has a design system: components, text styles, color variables, spacing tokens, effects, everything.
Enzo searches your design system first. It finds the components that match the task: buttons, badges, input fields, cards. It picks up your color variables, not hardcoded values, but the actual Figma variables you created. It uses your text styles for headings, body text, and labels. It applies your corner radius tokens and your spacing system.
The result looks like it belongs in your product. Because it does. It uses the same building blocks your team uses every day.
What Enzo Gets Right (And What Still Needs Tweaking)
When vibe designing with a design system in Enzo, here is what works well:
- Components: Enzo uses the correct components from your library: badges, buttons, cards, inputs
- Color variables: The selected colors come from your Figma variables, not random hex values
- Text styles: Headings and body text use your defined typography
- Corner radius: Variables are applied correctly for border radius
- Effects and strokes: Drop shadows and borders match your design system tokens
- Layer naming: Layers get descriptive names instead of "Frame 152", saving cleanup time
And here is what typically needs a designer's touch after:
- Padding values: Sometimes uses raw numbers instead of spacing variables (though this depends on how consistently you use variables in your own files)
- Component variants: Enzo might select a button with an icon when you would prefer the icon-less variant
- Layout alignment: Some elements may need centering or spacing adjustments
- Full-width behavior: Buttons and cards sometimes need width tweaks
This is exactly the point. Vibe design with Enzo is not about replacing the designer. It is about giving you a production-quality starting point that you can refine in minutes instead of building from zero.
How Vibe Design Works in Enzo
Enzo is an AI Figma plugin built specifically for vibe design. Here is how the process works, step by step:
Step 1: Write Your Prompt
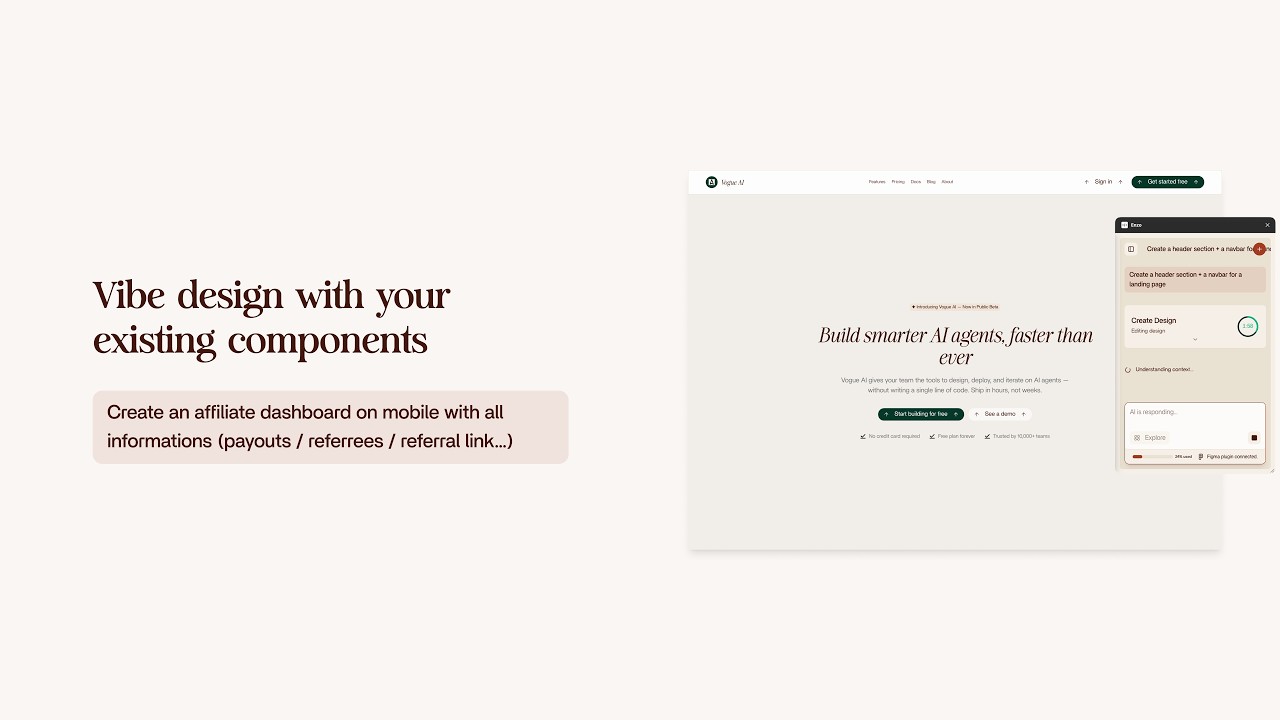
Open Enzo inside Figma and describe what you want. The prompt can be as simple as "create an affiliate dashboard on mobile" or as specific as "create a header section and a navbar for a landing page with a logo on the left, navigation links in the center, and a CTA button on the right."
Step 2: Choose Your Screen Type
Enzo asks whether you want a desktop or mobile layout. This determines the frame size and responsive behavior of the generated design.
Step 3: AI Plans the Design
Enzo analyzes your prompt and your existing design system (if one exists). It identifies which components, styles, and tokens are relevant to the task. This planning phase takes between one and three minutes depending on complexity.
During this phase, nothing changes in your Figma file yet. You can move around, check other pages, or keep working.
Step 4: Watch the Vibe Design Happen
Once planning is done, Enzo starts editing your Figma file in real time. You can watch it place components, apply styles, build layouts, and name layers, all happening directly on your canvas.
The entire editing process typically takes under a minute for simple screens like a navbar and hero section, and two to three minutes for more complex layouts like dashboards.
Step 5: Refine and Ship
When Enzo finishes, you have a fully editable Figma design built with your own components and styles. Review it, make the small tweaks that only a designer would catch, and ship it.
Vibe Design for Desktop and Web
Vibe design in Enzo works for both mobile and desktop layouts. In our second demo, we used the prompt "create a header section and a navbar for a landing page" and ran it on both a blank project and one with a design system.
The results followed the same pattern:
- With design system: The navbar and hero section used the correct brand colors, typography, button components, and spacing. The stroke styles and corner radii matched the existing design tokens. The result was production-ready with minimal tweaks.
- From scratch: The layout was functional but felt generic. The corners, colors, and typography had no brand identity. Still useful as a rapid prototype, but not something you would ship directly.
The takeaway: vibe design works best when it has context. A design system gives the AI the constraints it needs to produce work that fits your brand.
Why Vibe Design is Not Replacing Designers
This is important to say clearly: vibe design does not replace designers. Designers have the eye for what looks right and what does not. They understand visual hierarchy, brand consistency, and the subtle details that make a product feel polished.
What vibe design does is eliminate the repetitive setup work. Instead of spending 30 minutes building a dashboard layout from scratch, creating frames, placing components, setting up the grid, you describe what you want, get a solid starting point in two minutes, and spend your time on the creative decisions that actually matter.
Vibe design with Enzo is about designing faster with AI, not about removing the designer from the process.
Getting Started With Vibe Design in Figma
If you want to try vibe design with your own Figma projects, here is how to get started with Enzo:
- Install the Enzo plugin from the Figma community
- Open an existing project that has a design system (components, styles, variables) for the best results
- Write a prompt describing the screen or section you need
- Choose desktop or mobile when Enzo asks
- Wait for planning and editing, typically two to three minutes total
- Review and refine the generated design using your designer's eye
The more complete your design system is, with variables for colors, spacing, radius, and well-organized components, the better the vibe design output will be.


